> ## Documentation Index
> Fetch the complete documentation index at: https://docs.figma-console-mcp.southleft.com/llms.txt
> Use this file to discover all available pages before exploring further.
# Setup Guide
> Complete setup instructions for connecting Figma Console MCP to Claude Desktop, OpenAI Codex, GitHub Copilot, Cursor, Windsurf, and other AI clients.
# Figma Console MCP - Setup Guide
Complete setup instructions for connecting Figma Console MCP to various AI clients including Claude Desktop, OpenAI Codex, GitHub Copilot (VS Code), Cursor, Windsurf, and more.
***
## 🎯 Choose Your Setup
**First, decide what you want to do:**
| I want to... | Setup Method | Time |
| ------------------------------------------------- | -------------------------------------------------- | -------- |
| **Create, modify, and develop with AI** | [NPX Setup](#-npx-setup-recommended) (Recommended) | \~10 min |
| **Design from Claude.ai, v0, Replit, or Lovable** | [Cloud Mode](#-cloud-mode-web-ai-clients) | \~5 min |
| **Full capabilities with manual update control** | [Local Git Setup](#-local-git-setup-alternative) | \~15 min |
| **Set up with OpenAI Codex** (GUI config) | [Codex Setup](#-openai-codex) | \~5 min |
| **Just explore my design data** (read-only) | [Remote Mode](#-remote-mode-read-only-exploration) | \~2 min |
### ⚠️ Important: Capability Differences
| Capability | NPX / Local Git | Cloud Mode | Remote (read-only) |
| ----------------------------------- | --------------- | ------------ | ------------------ |
| Read design data | ✅ | ✅ | ✅ |
| **Create components & frames** | ✅ | ✅ | ❌ |
| **Edit existing designs** | ✅ | ✅ | ❌ |
| **Manage design tokens/variables** | ✅ | ✅ | ❌ |
| Screenshot validation | ✅ | ✅ | ✅ |
| Desktop Bridge plugin | ✅ | ✅ (required) | ❌ |
| Variables without Enterprise | ✅ | ✅ | ❌ |
| Real-time selection/change tracking | ✅ | ❌ | ❌ |
| Console log streaming | ✅ | ❌ | ❌ |
| Requires Node.js | Yes | No | No |
| **Total tools available** | **114** | **101** | **9** |
> **Bottom line:** Remote mode is **read-only** with 9 tools. Cloud Mode adds **write access** (101 tools) without Node.js. Local (NPX/Git) has **everything** (101 tools) including real-time monitoring.
***
## 🎓 Community Setup Guides
New to MCP servers, JSON configs, and terminal commands? These designer-friendly guides walk through the full NPX setup process step by step — created by designers, for designers.
### Joey Banks — Video Walkthrough
[Joey Banks](https://www.linkedin.com/in/joeyabanks) walks through setting up Figma Console MCP and using it to programmatically create 242 color swatches with linked variables, hex values, and RGB info — a task that would take hours manually.
> *"This to me is incredible. This is such an awesome way to visualize all of the colors or the crayons that we have to work with."* — Joey Banks
[View on LinkedIn →](https://www.linkedin.com/posts/joeyabanks_if-youve-been-curious-about-getting-started-activity-7430645064974106624-cRk6)
### Sergei Zhukov — Designer's Installation Guide
[Sergei Zhukov](https://www.linkedin.com/in/friendlyunit) created a comprehensive 17-page guide covering the entire setup process — from installing Homebrew and Node.js to configuring Claude Desktop and the Desktop Bridge Plugin. Includes pro tips on building design library context and creating automation workflows.
> *"Automate routine. Craft exceptional."* — Sergei Zhukov
[View on Figma Community →](https://www.figma.com/community/file/1606560040358762787/figma-mcp-console-setup-guide) · [View on LinkedIn →](https://www.linkedin.com/posts/friendlyunit_claude-figma-console-mcp-designers-guide-activity-7430399317426720768-KiBy)
Sergei also built [Design Agent Lab](https://designagentlab.com/), which includes a dedicated [Figma Console MCP skill](https://designagentlab.com/figma-console-mcp) for Claude — an interactive setup assistant that walks you through installation and configuration step by step.
***
## 🚀 NPX Setup (Recommended)
**Best for:** Anyone who wants full AI-assisted design and development capabilities with automatic updates.
**What you get:** All 114 tools including design creation, variable management, component instantiation, design-to-code workflows, and Desktop Bridge plugin support.
### Prerequisites Checklist
Before starting, verify you have:
* [ ] **Node.js 18+** installed — Check with `node --version` ([Download](https://nodejs.org))
* [ ] **Figma Desktop** installed (not just the web app)
* [ ] **An MCP client** installed (Claude Desktop, Claude Code, Cursor, Windsurf, etc.)
### Step 1: Get Your Figma Token (\~2 min)
1. Go to [Manage personal access tokens](https://help.figma.com/hc/en-us/articles/8085703771159-Manage-personal-access-tokens) in Figma Help
2. Follow the steps to **create a new personal access token**
3. Enter description: `Figma Console MCP`
4. **Set the following scopes:**
| Scope | Access | Why |
| ---------------- | ---------------- | ------------------------------------------------------- |
| **File content** | ✅ Read only | Read design data, components, styles, and render images |
| **Variables** | ✅ Read only | Read design tokens/variables (Enterprise plans only) |
| **Comments** | ✅ Read and write | Read and post comments on files |
> 💡 **No other scopes are needed.** Leave Webhooks, Dev resources, and Library analytics as "No access".
5. Click **"Generate token"**
6. **Copy the token immediately** — you won't see it again!
> 💡 Your token starts with `figd_` — if it doesn't, something went wrong.
### Step 2: Configure Your MCP Client (\~3 min)
> 💡 **Using OpenAI Codex?** Skip to the dedicated [Codex setup section](#-openai-codex) — it uses a graphical interface instead of JSON config files.
#### Claude Code (CLI)
**Option A: CLI command (quickest)**
```bash theme={null}
claude mcp add figma-console -s user -e FIGMA_ACCESS_TOKEN=figd_YOUR_TOKEN_HERE -e ENABLE_MCP_APPS=true -- npx -y figma-console-mcp@latest
```
**Option B: Edit the config file**
If you prefer editing the JSON config file directly:
* **macOS / Linux:** `~/.claude.json`
* **Windows:** `%USERPROFILE%\.claude.json`
Add the following to your `~/.claude.json` (create the file if it doesn't exist):
```json theme={null}
{
"mcpServers": {
"figma-console": {
"command": "npx",
"args": ["-y", "figma-console-mcp@latest"],
"env": {
"FIGMA_ACCESS_TOKEN": "figd_YOUR_TOKEN_HERE",
"ENABLE_MCP_APPS": "true"
}
}
}
}
```
> 💡 If `~/.claude.json` already exists with other MCP servers, just add the `"figma-console"` entry inside the existing `"mcpServers"` object.
#### Cursor / Windsurf / Other MCP Clients
Find your client's MCP config file and add:
```json theme={null}
{
"mcpServers": {
"figma-console": {
"command": "npx",
"args": ["-y", "figma-console-mcp@latest"],
"env": {
"FIGMA_ACCESS_TOKEN": "figd_YOUR_TOKEN_HERE",
"ENABLE_MCP_APPS": "true"
}
}
}
}
```
#### Claude Desktop
1. Open Claude Desktop
2. Go to **Settings** → **Developer** → **Edit Config** (or manually edit the config file)
* **macOS:** `~/Library/Application Support/Claude/claude_desktop_config.json`
* **Windows:** `%APPDATA%\Claude\claude_desktop_config.json`
3. Add the same JSON configuration shown above
4. **Save the file**
### Step 3: Connect to Figma Desktop (\~2 min)
#### Install the Desktop Bridge Plugin
The Desktop Bridge Plugin connects via WebSocket — no special Figma launch flags needed, and it persists across Figma restarts.
> **Stable import path:** The MCP server automatically copies plugin files to `~/.figma-console-mcp/plugin/` on startup. Import from this path — it never changes between npm updates.
1. **Open Figma Desktop** (normal launch, no special flags)
2. In Figma, go to **Plugins** → **Development** → **Import plugin from manifest...**
3. Navigate to `~/.figma-console-mcp/plugin/manifest.json` and select it
4. Click **"Open"** — the plugin appears in your Development plugins list
5. **Run the plugin** in your Figma file (Plugins → Development → Figma Desktop Bridge)
6. The plugin scans ports 9223–9232 on launch, connects to the first available MCP server, and shows `Local · ready` (or `Cloud · ready`, or `Local + Cloud · ready` if you also pair to cloud) in its status pill.
> **About plugin updates.** Figma caches plugin files (`code.js` and `ui.html`) at the application level. The MCP server keeps the stable path at `~/.figma-console-mcp/plugin/` in sync with the running build on every startup, but Figma uses its cached copy until you re-import.
>
> **Re-importing is *required* only when the release notes call it out** (typically when the plugin adds a new method the server needs — e.g. v1.22.4 and v1.10.0). For wire-compatible upgrades, re-importing is optional and only refreshes plugin-side cosmetic touches (status-pill copy, `pluginVersion` reporting). When you do re-import: Plugins → Manage plugins → re-import `~/.figma-console-mcp/plugin/manifest.json`.
> **Alternative path:** If `~/.figma-console-mcp/plugin/` doesn't exist yet (first run), you can find the path by running `npx figma-console-mcp@latest --print-path` or checking the `pluginPath` field in `figma_get_status`.
**📖 [Desktop Bridge Plugin Documentation](https://github.com/southleft/figma-console-mcp/tree/main/figma-desktop-bridge)**
#### Multi-Instance / Port Conflicts
Multiple MCP clients (e.g., Claude Desktop Chat + Code tabs, Claude + Cursor) are handled automatically:
* Each MCP server claims the next available port in the range 9223–9232
* The plugin connects to **all** active servers simultaneously
* Orphaned server processes from closed tabs are automatically detected and terminated on startup
* No manual port management needed (the plugin scans the whole range automatically)
### Step 4: Restart Your MCP Client (\~1 min)
1. **Restart your MCP client** (quit and reopen Claude Code, Cursor, Windsurf, Claude Desktop, etc.)
2. Verify the MCP server is connected (e.g., in Claude Desktop look for the 🔌 icon showing "figma-console: connected")
### Step 5: Test It! (\~2 min)
Try these prompts to verify everything works:
```
Check Figma status
```
→ Should show connection status with active WebSocket transport
```
Search for button components
```
→ Should return component results from your open Figma file
```
Create a simple frame with a blue background
```
→ Should create a frame in your Figma file (this confirms write access!)
**🎉 You're all set!** You now have full AI-assisted design capabilities.
***
## 🔧 Local Git Setup (Alternative)
**Best for:** Users who want more control over when updates happen, or developers who want to contribute to the project.
**What you get:** Same 114 tools as NPX. Updates are manual — you pull and rebuild when you're ready.
### Prerequisites
* [ ] Node.js 18+ installed
* [ ] Git installed
* [ ] Figma Desktop installed
* [ ] An MCP client installed (Claude Desktop, Claude Code, Cursor, Windsurf, etc.)
### Step 1: Clone and Build
```bash theme={null}
# Clone the repository
git clone https://github.com/southleft/figma-console-mcp.git
cd figma-console-mcp
# Install dependencies
npm install
# Build for local mode
npm run build:local
```
### Step 2: Get Figma Token
Same as [NPX Step 1](#step-1-get-your-figma-token-2-min) above.
### Step 3: Configure Your MCP Client
#### Claude Code (CLI)
**Option A: CLI command (quickest)**
```bash theme={null}
claude mcp add figma-console -s user -e FIGMA_ACCESS_TOKEN=figd_YOUR_TOKEN_HERE -e ENABLE_MCP_APPS=true -- node /absolute/path/to/figma-console-mcp/dist/local.js
```
**Option B: Edit the config file**
* **macOS / Linux:** `~/.claude.json`
* **Windows:** `%USERPROFILE%\.claude.json`
```json theme={null}
{
"mcpServers": {
"figma-console": {
"command": "node",
"args": ["/absolute/path/to/figma-console-mcp/dist/local.js"],
"env": {
"FIGMA_ACCESS_TOKEN": "figd_YOUR_TOKEN_HERE",
"ENABLE_MCP_APPS": "true"
}
}
}
}
```
#### Other MCP Clients (Cursor, Windsurf, Claude Desktop, etc.)
Edit your client's MCP config file:
```json theme={null}
{
"mcpServers": {
"figma-console": {
"command": "node",
"args": ["/absolute/path/to/figma-console-mcp/dist/local.js"],
"env": {
"FIGMA_ACCESS_TOKEN": "figd_YOUR_TOKEN_HERE",
"ENABLE_MCP_APPS": "true"
}
}
}
}
```
**Important:**
* Replace `/absolute/path/to/figma-console-mcp` with the actual path where you cloned the repo
* Use forward slashes `/` even on Windows
### Step 4: Connect to Figma Desktop
Same as [NPX Step 3](#step-3-connect-to-figma-desktop-2-min) above — install the Desktop Bridge Plugin.
### Step 5: Restart Your MCP Client and Test
Same as [NPX Steps 4 & 5](#step-4-restart-your-mcp-client-1-min) above.
### Updating
To get the latest changes:
```bash theme={null}
cd figma-console-mcp
git pull
npm install
npm run build:local
```
Then restart Claude Desktop.
***
## ☁️ Cloud Mode (Web AI Clients)
**Best for:** Claude.ai, v0, Replit, Lovable, and any MCP-capable web platform that needs to create and modify Figma designs.
**What you get:** 101 tools — full write access (create frames, components, variables, edit designs) plus REST API reads, design system extraction, comments, version history, slides, FigJam, and annotations. This is Remote Mode upgraded with the Cloud Write Relay.
**What you don't get vs Local:** Real-time selection tracking, document change monitoring, and console log streaming (these require a local WebSocket connection).
### Prerequisites
* [ ] **Figma Personal Access Token** — [Create one here](https://help.figma.com/hc/en-us/articles/8085703771159-Manage-personal-access-tokens) (starts with `figd_`)
* [ ] **Figma Desktop** with the Desktop Bridge plugin installed and running in your file
* [ ] A web AI client that supports MCP (Claude.ai, Lovable, v0, Replit, etc.)
> No Node.js required. The relay runs entirely in Cloudflare Workers.
### Step 1: Add the MCP Connector to Your Platform (\~1 min)
Add the Figma Console MCP endpoint to your AI platform's MCP settings:
**Endpoint URL:** `https://figma-console-mcp.southleft.com/mcp`
**Authentication:** Your Figma Personal Access Token as a Bearer token
How to add this depends on your platform:
| Platform | Where to Add |
| ----------------- | ------------------------------------------------------------------------------------------------------------------------------------------------------ |
| **Claude.ai** | Settings → Connectors → Add Custom Connector → Name: `Figma Console` / URL: `https://figma-console-mcp.southleft.com/mcp` |
| **Lovable** | Project Settings → Integrations → Add MCP Server → paste the URL and add your Figma PAT as Bearer token |
| **v0** | Settings → MCP Servers → Add Server → Streamable HTTP → paste URL → select **Bearer** auth → paste your Figma PAT (not OAuth) |
| **Replit** | Tools → MCP → Add Server → paste URL, set Authorization header to `Bearer figd_YOUR_TOKEN` |
| **Other clients** | Look for "Add MCP Server", "Custom Tool", or "Integrations" in your platform's settings. Provide the URL above and your Figma PAT as the Bearer token. |
### Step 2: Run the Desktop Bridge Plugin in Figma (\~30 sec)
1. Open **Figma Desktop** and navigate to your design file
2. Run the plugin: **Plugins → Development → Figma Desktop Bridge**
3. You should see the status pill showing the active transport: `Local · ready`, `Cloud · ready`, or `Local + Cloud · ready` (when paired with both)
> **First time?** Import the plugin once: In Figma go to Plugins → Development → Import plugin from manifest → select `~/.figma-console-mcp/plugin/manifest.json`. After future MCP server updates, re-importing is optional — only required when release notes specifically call for it (e.g. when the plugin adds a new method the server needs). Most upgrades stay wire-compatible with the previous plugin.
### Step 3: Pair via Cloud Mode (\~30 sec)
1. **Tell your AI to connect to your Figma plugin** using natural language:
* "Connect to my Figma plugin"
* "Pair with my design file"
* "I want to create designs in Figma"
2. **Your AI generates a 6-character pairing code** (expires in 5 minutes)
3. **In the Desktop Bridge plugin:**
* Toggle **"Cloud Mode"** (the small chevron below the status bar)
* Enter the pairing code
* Click **Connect**
4. **Done.** Your AI now has full write access to the open Figma file through the cloud relay.
### What You Can Do (93 Tools)
* ✅ Create frames, shapes, and components
* ✅ Edit existing designs (resize, reposition, restyle)
* ✅ Create and manage variables on any Figma plan (via Plugin API)
* ✅ Instantiate components and set instance properties
* ✅ Clone, delete, and rename nodes
* ✅ Set fills, strokes, and text content
* ✅ Set image fills on nodes
* ✅ Read design data, take screenshots, extract design systems
### What's Local-Only (Not Available in Cloud Mode)
* ❌ Real-time selection tracking
* ❌ Document change monitoring
* ❌ Console log streaming
* ❌ MCP Apps (Token Browser, Design System Dashboard)
### Tips
* The pairing code expires after **5 minutes** — generate a new one if it times out
* If the connection drops between AI turns, ask your AI to reconnect and enter a fresh code
* The Desktop Bridge plugin must stay running in your Figma file for the relay to work
* Variables work on **any Figma plan** (Free, Pro, Organization) because the relay uses the Plugin API, not the Enterprise REST API
***
## 📡 Remote Mode (Read-Only Exploration)
**Best for:** Quickly evaluating the tool or read-only design data extraction without any plugin setup.
**What you get:** 9 read-only tools for viewing design data, taking screenshots, reading console logs, and design system extraction.
> **Want write access?** See [Cloud Mode](#-cloud-mode-web-ai-clients) above — same remote endpoint, plus Desktop Bridge pairing for full design creation.
Two remote endpoints are available:
| Endpoint | Transport | Auth | Best For |
| -------- | ------------------ | ----------------------------- | -------------------------------------------- |
| `/sse` | Server-Sent Events | OAuth 2.1 (automatic) | Claude Desktop, Cursor, Windsurf |
| `/mcp` | Streamable HTTP | Bearer token (your Figma PAT) | Lovable, v0, Replit, any HTTP-capable client |
### Prerequisites
* [ ] Claude Desktop installed (for `/sse`), or an MCP-compatible code generator (for `/mcp`)
* For `/mcp`: A Figma Personal Access Token
### Option A: SSE Endpoint (Claude Desktop, Cursor, Windsurf)
The `/sse` endpoint uses OAuth — authentication happens automatically when you first connect.
**UI-Based Setup (Claude Desktop):**
1. Open Claude Desktop → **Settings** → **Connectors**
2. Click **"Add Custom Connector"**
3. Enter:
* **Name:** `Figma Console (Read-Only)`
* **URL:** `https://figma-console-mcp.southleft.com/sse`
4. Click **"Add"**
5. Done! ✅
**JSON Config:**
```json theme={null}
{
"mcpServers": {
"figma-console": {
"command": "npx",
"args": ["-y", "mcp-remote", "https://figma-console-mcp.southleft.com/sse"]
}
}
}
```
### Option B: Streamable HTTP Endpoint (AI Code Generators)
The `/mcp` endpoint accepts your Figma Personal Access Token as a Bearer token — no OAuth flow needed. This is ideal for AI code generators like Lovable, v0, and Replit that support custom MCP servers with Streamable HTTP transport.
**Endpoint:** `https://figma-console-mcp.southleft.com/mcp`
**Authentication:** Pass your Figma PAT as a Bearer token in the `Authorization` header.
**How to connect** depends on the platform — look for "Add MCP Server" or "Custom Tool" in your code generator's settings, provide the URL above, and add your Figma token as the Bearer token.
### What You Can Do (Read-Only)
* ✅ View design data and file structure
* ✅ Read design tokens/variables (Enterprise plan required)
* ✅ Take screenshots
* ✅ Read console logs
* ✅ Get component metadata
* ✅ Extract full design system via `figma_get_design_system_kit`
### What You Cannot Do
* ❌ Create frames, shapes, or components
* ❌ Edit existing designs
* ❌ Create or modify variables
* ❌ Instantiate components
### Upgrading to Write Access
Want to create and modify designs? See [Cloud Mode](#-cloud-mode-web-ai-clients) above — pair the Desktop Bridge plugin and get full write access from the same `/mcp` endpoint.
***
## 🤖 GitHub Copilot (VS Code)
GitHub Copilot supports MCP servers as of VS Code 1.102+.
### Prerequisites
* VS Code 1.102 or later
* GitHub Copilot extension installed and active
* For full capabilities: Node.js 18+ and Figma Personal Access Token
### Quick Setup (CLI)
**Full capabilities (recommended):**
```bash theme={null}
# Create env file for your token
echo "FIGMA_ACCESS_TOKEN=figd_YOUR_TOKEN_HERE" > ~/.figma-console-mcp.env
# Add the server
code --add-mcp '{"name":"figma-console","command":"npx","args":["-y","figma-console-mcp@latest"],"envFile":"~/.figma-console-mcp.env"}'
```
**Read-only mode:**
```bash theme={null}
code --add-mcp '{"name":"figma-console","type":"sse","url":"https://figma-console-mcp.southleft.com/sse"}'
```
### Manual Configuration
Create `.vscode/mcp.json` in your project:
**Full capabilities:**
```json theme={null}
{
"servers": {
"figma-console": {
"command": "npx",
"args": ["-y", "figma-console-mcp@latest"],
"env": {
"FIGMA_ACCESS_TOKEN": "figd_YOUR_TOKEN_HERE"
}
}
}
}
```
> **Security Tip:** Use `envFile` instead of inline `env` to keep tokens out of version control.
### Starting the Server
1. Open Command Palette (**Cmd+Shift+P** / **Ctrl+Shift+P**)
2. Run **"MCP: List Servers"**
3. Click on **"figma-console"** to start it
4. VS Code may prompt you to **trust the server** — click Allow
***
## 🧠 OpenAI Codex
OpenAI Codex uses a graphical interface for MCP server configuration instead of JSON files. This makes setup straightforward — just fill in the fields.
### Prerequisites
* [OpenAI Codex desktop app](https://openai.com/codex/get-started/) installed
* Node.js 18+ installed
* Figma Desktop installed
* Figma Personal Access Token ([get one](#step-1-get-your-figma-token-2-min))
### Step 1: Add the MCP Server (\~2 min)
1. Open Codex and go to **Settings** (gear icon in the sidebar)
2. Click **Settings** again in the submenu
3. Select **MCP servers** from the left sidebar
4. Click **"Add MCP Server"** (or create a new server)
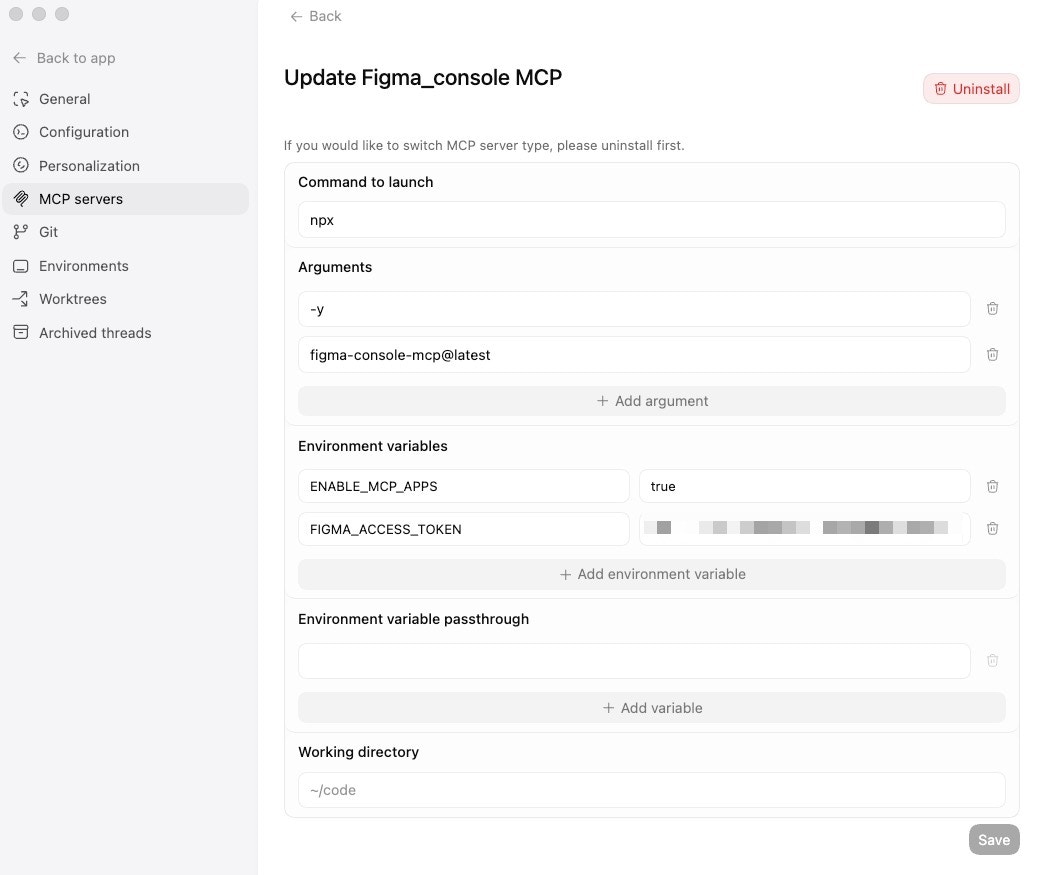
5. Fill in the fields:
| Field | Value |
| ------------------------- | ------------------------------------------------------ |
| **Server name** | `Figma Console MCP` (or any name you prefer) |
| **Command to launch** | `npx` |
| **Arguments** | Add two arguments: `-y` and `figma-console-mcp@latest` |
| **Environment variables** | `FIGMA_ACCESS_TOKEN` = `figd_YOUR_TOKEN_HERE` |
| **Environment variables** | `ENABLE_MCP_APPS` = `true` |
6. Click **Save**
Here's what the completed configuration looks like:
> 💡 **Tip:** The Codex UI adds arguments one at a time. Click **"+ Add argument"** after entering `-y` to add the second argument `figma-console-mcp@latest`.
### Step 2: Connect to Figma Desktop
Same as [NPX Step 3](#step-3-connect-to-figma-desktop-2-min) above — install the Desktop Bridge Plugin in Figma.
### Step 3: Test It
Start a new thread in Codex and try:
```
Use the Figma Console connector to check Figma status
```
If the Desktop Bridge plugin isn't running yet, the server will connect but report that Figma Desktop isn't linked. Run the plugin in your Figma file (Plugins → Development → Figma Desktop Bridge) and ask Codex to check again.
### Equivalent JSON Config
For reference, the Codex GUI fields map directly to the [NPX JSON configuration](#step-2-configure-your-mcp-client-3-min) used by other MCP clients like Claude Desktop, Cursor, and Windsurf.
***
## 🛠️ Troubleshooting
### Quick Fixes
| Symptom | Likely Cause | Fix |
| -------------------------------------- | ---------------------------------------------------- | --------------------------------------------------------------------------------------------------------- |
| "Failed to connect to Figma Desktop" | No transport available | Install Desktop Bridge Plugin and run it in your Figma file |
| "FIGMA\_ACCESS\_TOKEN not configured" | Missing or wrong token | Check token in config, must start with `figd_` |
| "Command not found: node" | Node.js not installed | Install Node.js 18+ from nodejs.org |
| Tools not appearing in MCP client | Config not loaded | Restart your MCP client completely |
| "Port 9223 already in use" | Another MCP instance or orphaned process | Server auto-falls back to 9224–9232. Orphaned processes are auto-cleaned on startup (v1.14.0+). |
| WebSocket unreachable from Docker host | Server bound to localhost | Set `FIGMA_WS_HOST=0.0.0.0` and expose port with `-p 9223:9223` |
| Plugin shows "MCP scanning" | MCP server not running yet | Start/restart your MCP client so the server starts. The plugin retries every few seconds. |
| Plugin shows "No MCP server found" | All retries exhausted | Ensure an MCP client is running. Check for stale processes: `lsof -i :9223-9232 \| grep LISTEN` |
| NPX using old version | Cached package | Use `figma-console-mcp@latest` explicitly |
| Cloud pairing code expired | Code is older than 5 minutes | Ask your AI to generate a new pairing code |
| Cloud connection drops between turns | Relay session ended | Re-pair by asking your AI to reconnect, then enter the new code in the plugin |
| Cloud Mode toggle not showing | Stale cached plugin from before Cloud Mode was added | Re-import manifest from `~/.figma-console-mcp/plugin/manifest.json` to refresh Figma's cached plugin code |
### Node.js Version Issues
**Symptom:** Cryptic errors like "parseArgs not exported from 'node:util'"
**Fix:** You need Node.js 18 or higher.
```bash theme={null}
# Check your version
node --version
# Should show v18.x.x or higher
```
If using **NVM** and having issues, try using the absolute path to Node:
```json theme={null}
{
"mcpServers": {
"figma-console": {
"command": "/Users/yourname/.nvm/versions/node/v20.10.0/bin/node",
"args": ["-e", "require('figma-console-mcp')"],
"env": {
"FIGMA_ACCESS_TOKEN": "figd_YOUR_TOKEN_HERE"
}
}
}
}
```
### Claude Code OAuth Issues
> **⚠️ Known Issue:** Claude Code's native `--transport sse` has a bug where OAuth completes but the connection fails. Use `mcp-remote` instead.
**Don't use:**
```bash theme={null}
# This has a known bug
claude mcp add figma-console --transport sse https://figma-console-mcp.southleft.com/sse
```
**Use instead:**
```bash theme={null}
# This works correctly
claude mcp add figma-console -s user -- npx -y mcp-remote@latest https://figma-console-mcp.southleft.com/sse
```
Or better yet, use the NPX setup for full capabilities:
```bash theme={null}
claude mcp add figma-console -s user -- npx -y figma-console-mcp@latest
```
### Config File Syntax Errors
If Claude Desktop doesn't see your MCP server:
1. **Validate your JSON:** Use a tool like [jsonlint.com](https://jsonlint.com)
2. **Check for common mistakes:**
* Missing commas between properties
* Trailing commas (not allowed in JSON)
* Wrong quote characters (must be `"` not `'` or smart quotes)
3. **Copy the exact config** from this guide — don't retype it
### Still Having Issues?
1. Check the [GitHub Issues](https://github.com/southleft/figma-console-mcp/issues)
2. Ask in [Discussions](https://github.com/southleft/figma-console-mcp/discussions)
3. Include:
* Your setup method (NPX, Local Git, or Remote)
* The exact error message
* Output of `node --version`
* Your MCP client (Claude Desktop, Claude Code, etc.)
***
## Optional: Enable MCP Apps
MCP Apps provide interactive UI experiences like the Token Browser and Design System Dashboard. As of v1.10.0, `ENABLE_MCP_APPS=true` is included in the default configuration examples above.
If you set up before v1.10.0, add `"ENABLE_MCP_APPS": "true"` to the `env` section of your MCP config.
> **Note:** MCP Apps require a client with [ext-apps protocol](https://github.com/anthropics/anthropic-cookbook/tree/main/misc/model_context_protocol/ext-apps) support.
***
## Next Steps
1. **Try example prompts:** See [Use Cases](use-cases) for workflow examples
2. **Explore all tools:** See [Tools Reference](tools) for the complete tool list
3. **Learn about the Desktop Bridge plugin:** See [Desktop Bridge README](https://github.com/southleft/figma-console-mcp/tree/main/figma-desktop-bridge) for advanced configuration
***
## Support
* 📖 [Full Documentation](/)
* 🐛 [Report Issues](https://github.com/southleft/figma-console-mcp/issues)
* 💬 [Discussions](https://github.com/southleft/figma-console-mcp/discussions)
* 📊 [Mode Comparison](mode-comparison)
 > 💡 **Tip:** The Codex UI adds arguments one at a time. Click **"+ Add argument"** after entering `-y` to add the second argument `figma-console-mcp@latest`.
### Step 2: Connect to Figma Desktop
Same as [NPX Step 3](#step-3-connect-to-figma-desktop-2-min) above — install the Desktop Bridge Plugin in Figma.
### Step 3: Test It
Start a new thread in Codex and try:
```
Use the Figma Console connector to check Figma status
```
If the Desktop Bridge plugin isn't running yet, the server will connect but report that Figma Desktop isn't linked. Run the plugin in your Figma file (Plugins → Development → Figma Desktop Bridge) and ask Codex to check again.
### Equivalent JSON Config
For reference, the Codex GUI fields map directly to the [NPX JSON configuration](#step-2-configure-your-mcp-client-3-min) used by other MCP clients like Claude Desktop, Cursor, and Windsurf.
***
## 🛠️ Troubleshooting
### Quick Fixes
| Symptom | Likely Cause | Fix |
| -------------------------------------- | ---------------------------------------------------- | --------------------------------------------------------------------------------------------------------- |
| "Failed to connect to Figma Desktop" | No transport available | Install Desktop Bridge Plugin and run it in your Figma file |
| "FIGMA\_ACCESS\_TOKEN not configured" | Missing or wrong token | Check token in config, must start with `figd_` |
| "Command not found: node" | Node.js not installed | Install Node.js 18+ from nodejs.org |
| Tools not appearing in MCP client | Config not loaded | Restart your MCP client completely |
| "Port 9223 already in use" | Another MCP instance or orphaned process | Server auto-falls back to 9224–9232. Orphaned processes are auto-cleaned on startup (v1.14.0+). |
| WebSocket unreachable from Docker host | Server bound to localhost | Set `FIGMA_WS_HOST=0.0.0.0` and expose port with `-p 9223:9223` |
| Plugin shows "MCP scanning" | MCP server not running yet | Start/restart your MCP client so the server starts. The plugin retries every few seconds. |
| Plugin shows "No MCP server found" | All retries exhausted | Ensure an MCP client is running. Check for stale processes: `lsof -i :9223-9232 \| grep LISTEN` |
| NPX using old version | Cached package | Use `figma-console-mcp@latest` explicitly |
| Cloud pairing code expired | Code is older than 5 minutes | Ask your AI to generate a new pairing code |
| Cloud connection drops between turns | Relay session ended | Re-pair by asking your AI to reconnect, then enter the new code in the plugin |
| Cloud Mode toggle not showing | Stale cached plugin from before Cloud Mode was added | Re-import manifest from `~/.figma-console-mcp/plugin/manifest.json` to refresh Figma's cached plugin code |
### Node.js Version Issues
**Symptom:** Cryptic errors like "parseArgs not exported from 'node:util'"
**Fix:** You need Node.js 18 or higher.
```bash theme={null}
# Check your version
node --version
# Should show v18.x.x or higher
```
If using **NVM** and having issues, try using the absolute path to Node:
```json theme={null}
{
"mcpServers": {
"figma-console": {
"command": "/Users/yourname/.nvm/versions/node/v20.10.0/bin/node",
"args": ["-e", "require('figma-console-mcp')"],
"env": {
"FIGMA_ACCESS_TOKEN": "figd_YOUR_TOKEN_HERE"
}
}
}
}
```
### Claude Code OAuth Issues
> **⚠️ Known Issue:** Claude Code's native `--transport sse` has a bug where OAuth completes but the connection fails. Use `mcp-remote` instead.
**Don't use:**
```bash theme={null}
# This has a known bug
claude mcp add figma-console --transport sse https://figma-console-mcp.southleft.com/sse
```
**Use instead:**
```bash theme={null}
# This works correctly
claude mcp add figma-console -s user -- npx -y mcp-remote@latest https://figma-console-mcp.southleft.com/sse
```
Or better yet, use the NPX setup for full capabilities:
```bash theme={null}
claude mcp add figma-console -s user -- npx -y figma-console-mcp@latest
```
### Config File Syntax Errors
If Claude Desktop doesn't see your MCP server:
1. **Validate your JSON:** Use a tool like [jsonlint.com](https://jsonlint.com)
2. **Check for common mistakes:**
* Missing commas between properties
* Trailing commas (not allowed in JSON)
* Wrong quote characters (must be `"` not `'` or smart quotes)
3. **Copy the exact config** from this guide — don't retype it
### Still Having Issues?
1. Check the [GitHub Issues](https://github.com/southleft/figma-console-mcp/issues)
2. Ask in [Discussions](https://github.com/southleft/figma-console-mcp/discussions)
3. Include:
* Your setup method (NPX, Local Git, or Remote)
* The exact error message
* Output of `node --version`
* Your MCP client (Claude Desktop, Claude Code, etc.)
***
## Optional: Enable MCP Apps
MCP Apps provide interactive UI experiences like the Token Browser and Design System Dashboard. As of v1.10.0, `ENABLE_MCP_APPS=true` is included in the default configuration examples above.
If you set up before v1.10.0, add `"ENABLE_MCP_APPS": "true"` to the `env` section of your MCP config.
> **Note:** MCP Apps require a client with [ext-apps protocol](https://github.com/anthropics/anthropic-cookbook/tree/main/misc/model_context_protocol/ext-apps) support.
***
## Next Steps
1. **Try example prompts:** See [Use Cases](use-cases) for workflow examples
2. **Explore all tools:** See [Tools Reference](tools) for the complete tool list
3. **Learn about the Desktop Bridge plugin:** See [Desktop Bridge README](https://github.com/southleft/figma-console-mcp/tree/main/figma-desktop-bridge) for advanced configuration
***
## Support
* 📖 [Full Documentation](/)
* 🐛 [Report Issues](https://github.com/southleft/figma-console-mcp/issues)
* 💬 [Discussions](https://github.com/southleft/figma-console-mcp/discussions)
* 📊 [Mode Comparison](mode-comparison)
> 💡 **Tip:** The Codex UI adds arguments one at a time. Click **"+ Add argument"** after entering `-y` to add the second argument `figma-console-mcp@latest`.
### Step 2: Connect to Figma Desktop
Same as [NPX Step 3](#step-3-connect-to-figma-desktop-2-min) above — install the Desktop Bridge Plugin in Figma.
### Step 3: Test It
Start a new thread in Codex and try:
```
Use the Figma Console connector to check Figma status
```
If the Desktop Bridge plugin isn't running yet, the server will connect but report that Figma Desktop isn't linked. Run the plugin in your Figma file (Plugins → Development → Figma Desktop Bridge) and ask Codex to check again.
### Equivalent JSON Config
For reference, the Codex GUI fields map directly to the [NPX JSON configuration](#step-2-configure-your-mcp-client-3-min) used by other MCP clients like Claude Desktop, Cursor, and Windsurf.
***
## 🛠️ Troubleshooting
### Quick Fixes
| Symptom | Likely Cause | Fix |
| -------------------------------------- | ---------------------------------------------------- | --------------------------------------------------------------------------------------------------------- |
| "Failed to connect to Figma Desktop" | No transport available | Install Desktop Bridge Plugin and run it in your Figma file |
| "FIGMA\_ACCESS\_TOKEN not configured" | Missing or wrong token | Check token in config, must start with `figd_` |
| "Command not found: node" | Node.js not installed | Install Node.js 18+ from nodejs.org |
| Tools not appearing in MCP client | Config not loaded | Restart your MCP client completely |
| "Port 9223 already in use" | Another MCP instance or orphaned process | Server auto-falls back to 9224–9232. Orphaned processes are auto-cleaned on startup (v1.14.0+). |
| WebSocket unreachable from Docker host | Server bound to localhost | Set `FIGMA_WS_HOST=0.0.0.0` and expose port with `-p 9223:9223` |
| Plugin shows "MCP scanning" | MCP server not running yet | Start/restart your MCP client so the server starts. The plugin retries every few seconds. |
| Plugin shows "No MCP server found" | All retries exhausted | Ensure an MCP client is running. Check for stale processes: `lsof -i :9223-9232 \| grep LISTEN` |
| NPX using old version | Cached package | Use `figma-console-mcp@latest` explicitly |
| Cloud pairing code expired | Code is older than 5 minutes | Ask your AI to generate a new pairing code |
| Cloud connection drops between turns | Relay session ended | Re-pair by asking your AI to reconnect, then enter the new code in the plugin |
| Cloud Mode toggle not showing | Stale cached plugin from before Cloud Mode was added | Re-import manifest from `~/.figma-console-mcp/plugin/manifest.json` to refresh Figma's cached plugin code |
### Node.js Version Issues
**Symptom:** Cryptic errors like "parseArgs not exported from 'node:util'"
**Fix:** You need Node.js 18 or higher.
```bash theme={null}
# Check your version
node --version
# Should show v18.x.x or higher
```
If using **NVM** and having issues, try using the absolute path to Node:
```json theme={null}
{
"mcpServers": {
"figma-console": {
"command": "/Users/yourname/.nvm/versions/node/v20.10.0/bin/node",
"args": ["-e", "require('figma-console-mcp')"],
"env": {
"FIGMA_ACCESS_TOKEN": "figd_YOUR_TOKEN_HERE"
}
}
}
}
```
### Claude Code OAuth Issues
> **⚠️ Known Issue:** Claude Code's native `--transport sse` has a bug where OAuth completes but the connection fails. Use `mcp-remote` instead.
**Don't use:**
```bash theme={null}
# This has a known bug
claude mcp add figma-console --transport sse https://figma-console-mcp.southleft.com/sse
```
**Use instead:**
```bash theme={null}
# This works correctly
claude mcp add figma-console -s user -- npx -y mcp-remote@latest https://figma-console-mcp.southleft.com/sse
```
Or better yet, use the NPX setup for full capabilities:
```bash theme={null}
claude mcp add figma-console -s user -- npx -y figma-console-mcp@latest
```
### Config File Syntax Errors
If Claude Desktop doesn't see your MCP server:
1. **Validate your JSON:** Use a tool like [jsonlint.com](https://jsonlint.com)
2. **Check for common mistakes:**
* Missing commas between properties
* Trailing commas (not allowed in JSON)
* Wrong quote characters (must be `"` not `'` or smart quotes)
3. **Copy the exact config** from this guide — don't retype it
### Still Having Issues?
1. Check the [GitHub Issues](https://github.com/southleft/figma-console-mcp/issues)
2. Ask in [Discussions](https://github.com/southleft/figma-console-mcp/discussions)
3. Include:
* Your setup method (NPX, Local Git, or Remote)
* The exact error message
* Output of `node --version`
* Your MCP client (Claude Desktop, Claude Code, etc.)
***
## Optional: Enable MCP Apps
MCP Apps provide interactive UI experiences like the Token Browser and Design System Dashboard. As of v1.10.0, `ENABLE_MCP_APPS=true` is included in the default configuration examples above.
If you set up before v1.10.0, add `"ENABLE_MCP_APPS": "true"` to the `env` section of your MCP config.
> **Note:** MCP Apps require a client with [ext-apps protocol](https://github.com/anthropics/anthropic-cookbook/tree/main/misc/model_context_protocol/ext-apps) support.
***
## Next Steps
1. **Try example prompts:** See [Use Cases](use-cases) for workflow examples
2. **Explore all tools:** See [Tools Reference](tools) for the complete tool list
3. **Learn about the Desktop Bridge plugin:** See [Desktop Bridge README](https://github.com/southleft/figma-console-mcp/tree/main/figma-desktop-bridge) for advanced configuration
***
## Support
* 📖 [Full Documentation](/)
* 🐛 [Report Issues](https://github.com/southleft/figma-console-mcp/issues)
* 💬 [Discussions](https://github.com/southleft/figma-console-mcp/discussions)
* 📊 [Mode Comparison](mode-comparison)